Sticky Navigation Bar

Sunday, August 31, 2014

Favorite: Supplies & Tools (Part 2)

Favorites2-(W)

It's been a few days, but I'm back!  Sorry I wasn't able to get this post up sooner, I didn't have any internet connection for a couple of days.  This is a continuation of some of my favorite miniature things. If you want, you can read part 1here.  Everything is pretty self-explanatory, but if you have any questions, feel free to leave them in the comments.

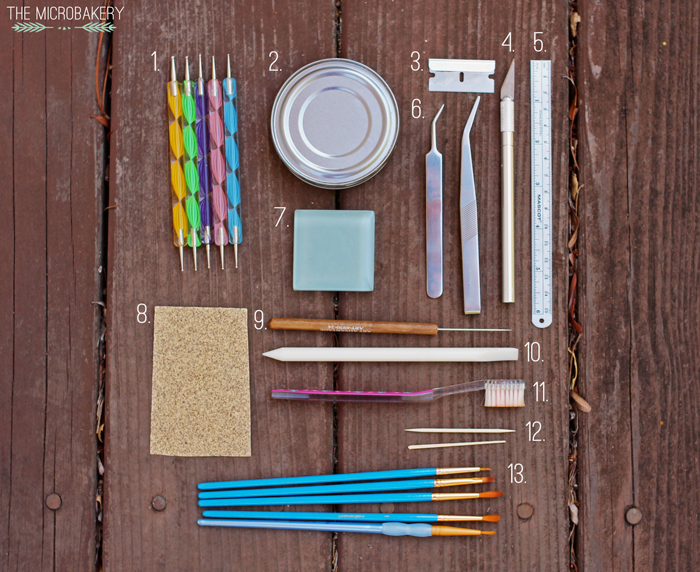
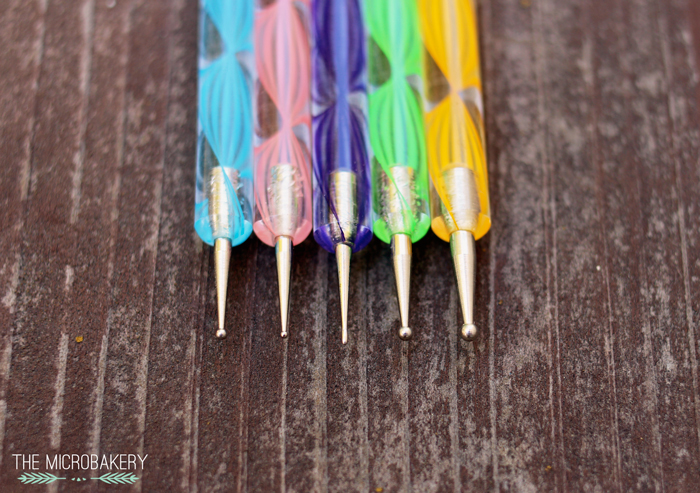
1.  Dotting tools--  You'll notice most miniaturists use some sort of dotting tool to create their minis.  They are incredibly versatile and helpful.  You can find them for a low price on ebay or possibly a local beauty supply store.  I recommend finding a set that has a rounded tip (like the purple tool in the middle), but if you only find sets with ball tips, you can just file one down to make a more pointed tip.
Favorites-Closeup-(W)

2.  Can lids--I took this idea after seeing FatalPotato do this in several photos. Let me just say...it...is...life...changing. The clay sticks nicely onto the lid so it won't slip and slide.  You'll be able to not only lift the clay, but put it in better angles where 1) you can see what you're doing better, and 2) allow your tools to reach certain areas better.  You can even leave your piece on the lid and bake it!

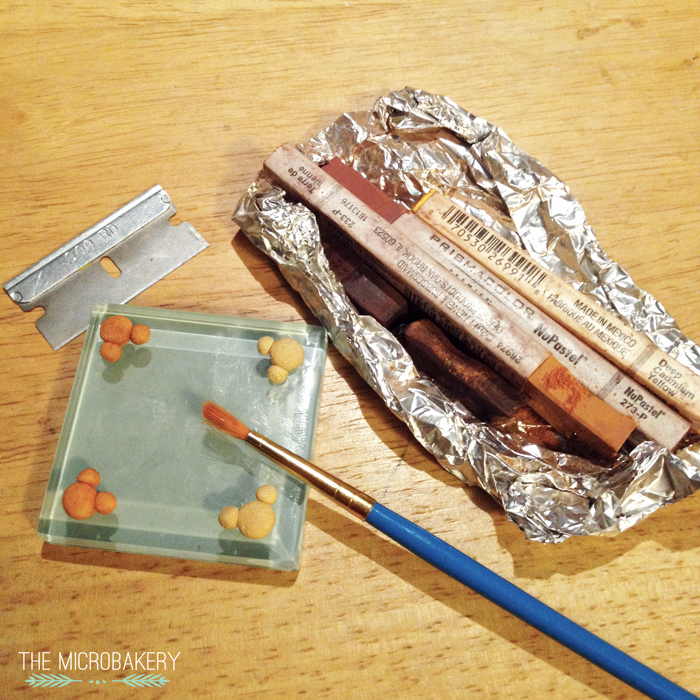
3.  Razor blades--Pretty self-explanatory, but I use razor blades to slice clay or scrape off some chalk pastel dust.  Always use a sharp blade to make a clean slice through the clay.

4.  X-acto knife--I use this the same way as the razor blades, but sometimes a miniature calls for different blades.

5.  Ruler--Always have one handy to make sure things stay to scale.

6.  Tweezers--I use two types of tweezers, one is a needle nose shape and the other a more dull nose shape.  The needle nose are great for placement of items that need to be placed in a precise place.

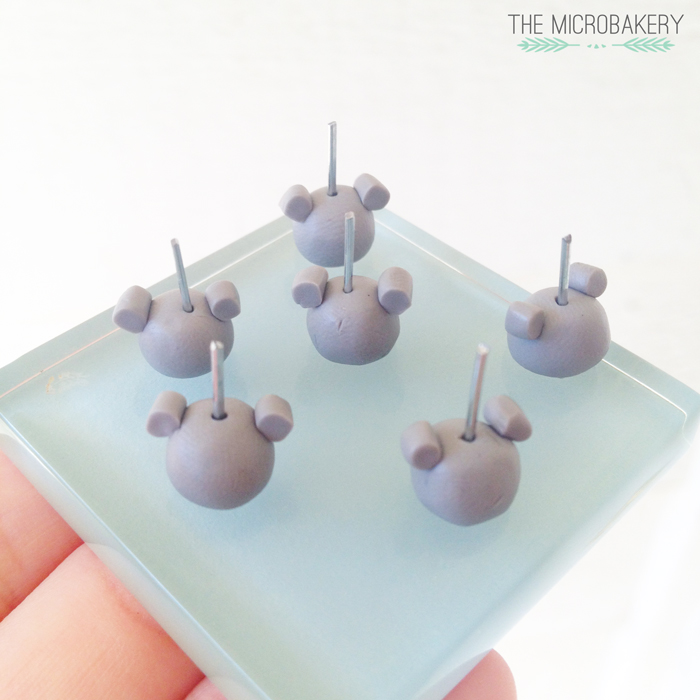
7.  Glass tile--  I use this exactly like I do with the can lids.  However, I find the clay sticks better to the glass than the metal.

8.  Sand paper--great for adding texture.  I suggest using a more fine grit, otherwise it will leave indentations that are too big and out of scale to your piece.

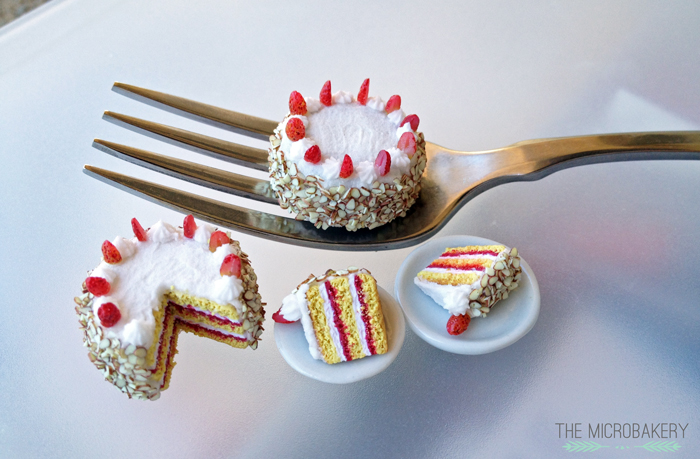
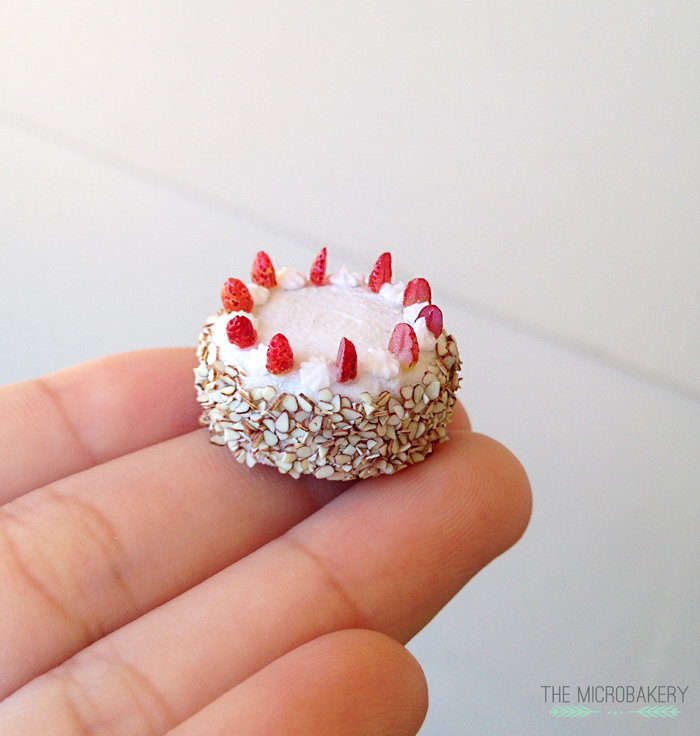
9.  Needle tool--I use this all the time for creating the "fluffy" cake-like texture on things.  Like the dotting tools, you can easily find this on ebay.  But, it's not completely necessary to buy one.  You can always get a sewing needle and bake on a clay handle.

10.  Clay shaper--This plastic tool comes in handy once in a while.  One end is a dull-ended cone-shaped point and the other side has a curved taper end.  I believe I got this one from Blick Art.

11.  Soft toothbrush--Great for texturing, just like sandpaper.  I prefer to use softer more dense bristle as it gives a different texture effect than a more stiff bristle.

12.  Toothpicks--Always handy for anything from texturing to clay shaping.  I like using two different kinds, one with a pointed sharp end, and one with a dull flat end.

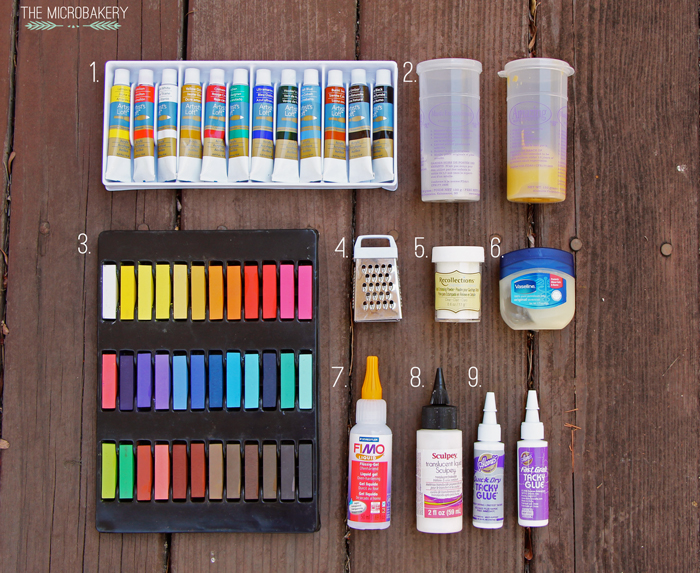
13.  Paint brushes--To add acrylic paint or chalk pastels to clay.

Tuesday, August 19, 2014

Favorite: Supplies & Tools (Part 1)

Favorites1-(W)

Since I currently can't make any new miniatures (sad, I know :[ ) I thought I would write about some of my favorite supplies and tools I use.  If you have any further questions about where I buy my supplies or how I use them, leave them in the comments!  So without further adieu, let's get started.

1. Acrylic Paints--Acrylic paints are not necessary, but they can help add a nice effect after baking you piece.  This set by Artist's Loft was pretty cheap ($5) for an assortment of colors, so it didn't hurt to try it out.  It's great for adding extra dimension to your miniature.  Sometimes I thin out the paint with water to make a light wash of color.  Adding a light wash of a dark color can usually help bring out the detail, I did that for Mickey's face on my mickey waffle.  I wouldn't recommend putting this in the oven, as I'm not sure what type of toxic fumes it may give off (maybe breathing it will make me grow a third arm, that would actually be really helpful!)

2. Molding Putty--Amazing Mold Putty is a two-part silicone mold that holds details pretty well and cures in 20 minutes (with a 2-3 minute working time).  It's quite expensive so I suggest using a coupon if you are buying at Michael's.  But it does last a long time since the things I mold are so tiny.  I suggest using a small round cookie cutter (or something similar) and placing your item in it, then press the putty over your object.  

3. Soft Pastels--This is also by Artist's Loft and was under $5.  Soft pastels are also called chalk pastels and are different from oil pastels.  These have pretty good pigmentation and a good assortment of colors.  I usually use a blade to scrape some color off and then use a paintbrush to make that "baked" effect.  If you want a more intense color, add the tiniest bit of water to it and mix.  It's also good for mixing with TLS or Fimo deco gel to create sauces or even colored frostings.

4. Mini Grater--You technically can use any grater you find, but I highly suggest using one with small graters (is that what it's called? lol) to get a finer texture, but it depends on what you want to use it for.  I use this to create anything from tiny sprinkles, to chocolate shavings, coconut shavings, or even finely chopped herbs.  The only problem I have with it is, if you are grating baked clay, the shaved bits tend to be much lighter in color than the color of clay you are shaving it from.  It's unfortunately the same effect that happens when you cute baked clay with a blade.  I'm not sure how to explain it, but try it and you'll see.

5. Embossing Powder--This is from the brand Recollections, but any embossing powder will do.  This is used for the sugar effect because they are such fine particles.  You could also use white sand for sugar, it will do much better in the oven too.  Do not stick embossing powder in the oven! It will melt the particles together giving you a smooth effect, unless that's what you want.

6. Petroleum Jelly--Since polymer clay (at least Sculpey) is oil based, mixing petroleum jelly with clay will help soften it and give you almost the same effect as adding TLS to it.  It would be be on the thicker side though.  I like to add it to clay to soften it up so I can pipe it onto things.  It also uses the same baking times as any other Sculpey clay.

7. Fimo Liquid Gel--I heard they stopped producing this.  So sad... But that's ok because there are a couple other solutions out there to get around this.  This has a much thinner consistency than TLS and bakes much more clear and flexible.  It's great for sauces that are more on the translucent side, you can even add soft pastels or clay to color it and make it thicker.

8. Sculpey Translucent Liquid Sculpey--Aka TLS.  It has a much thicker consistency than Fimo liquid gel and bakes more opaque than it too.  But this is also a great solution to frostings, sauces, and whatever else you may want to make.  As mentioned above, I can also mix this with some solid clay to make a super soft clay that I can pipe.

9. Glue--Last but not least on my favorites list are Aleene's Quick Dry & Fast Grab Tacky Glue.  At first I couldn't tell the difference between quick dry and fast grab, but after using them for a while, boy is there a major difference.  There are times when one of them come in more handy than the other, but the good thing is they both dry clear and matte.  Like quick dry states, it is a quick drying glue that is thin in consistency but still gives you a couple of seconds to readjust whatever you put down.  Fast grab on the other hand is much thicker and tackier and there really isn't too much adjustment time with this glue.  They both have their uses so test them out before you start gluing your actual miniatures.

Thanks for hanging in there! I will have a part 2 coming up soon, possibly next week, about my favorite tools :)  So watch out for that.

Sunday, August 17, 2014

Status Update

Hello! Thank you for stopping by my blog :)  Bear with me for the next week or two as I have some real life stuff I need to do.  I still have a few posts planned to go up in that timeframe.  Since I won't be able to make any miniatures until the end of August, I'll be posting a series about my favorite miniature things.

If you want to see more current status updates, I recommend you follow my Facebook page www.Facebook.com/TheMicrobakery

Thanks!

-The Microbakery

Wednesday, August 13, 2014

Strawberry Cream Cake

Last week was one of my sibling's birthday and for the past couple of years their favorite birthday cake has been a strawberry cream cake.  I thought it would be quite cute to make a miniature version, just like I did for my favorite birthday cake.  And incase you were wondering, yes, each almond was individually sliced, but it was worth it!

I wish I had the talent to write "Happy Birthday" on the top of the cake, but making letters that thin is so challenging!
  StawberryCake2-(W)

StrawberryCake1-(W)

StrawberryCake3-(W)

Thursday, August 7, 2014

Disney Food!

One of my favorite places in the world is Disneyland.  Unfortunately it has been a very long time since I've been, but it's okay because it makes every visit that much more memorable.  Another thing I love about the happiest place on earth are all the Mickey Mouse shaped food!  Inspired by all the Disney food, I decided to make a few Mickey (and Minnie!) miniatures.

Disney-Food1-(W)

I first started off making some Mickey beignets which you can get at Cafe Orleans.  I've never actually had the Mickey shaped beignet, but I did eat the ones sold in Downtown Disney which are drool-inducingly good.  After shaping the beignets, I textured it with some sandpaper and a toothbrush, added the "baked" effect with brown soft pastels, and then baked it.  Then to get the powdered sugar look, I dabbed on some white acrylic paint.  I made the little sauce cups and filled them with TLS and Fimo deko gel to represent the raspberry coulis and vanilla bean creme anglaise.

Mickey-Beignet-WIP-(W)

Mickey-Beignet2-(W)

Next up was the giant Mickey waffle from Carnation Cafe on Disneyland's Main Street.  It's served with chicken-apple sausages, strawberries, raspberries, blackberries, maple syrup, and a dollop of whipped cream!  Yumm... Who doesn't love breakfast? :)

Mickey-Waffle1-(W)

Mickey-Waffle3-(W)

Last but not least, I had to recreate the famous Mickey and Minnie Mouse candy apples!  I originally saw this on Bridget McCarty's Instagram account when she made them, and instantly I knew I wanted to try and make them too.  Bridget is an amazing and incredibly talented artist who works for Disney and I highly recommend that you follow her.  She also made a whole bunch of other adorable Disney food miniatures that you should check out.  Here are her links:
Bridget's website: http://www.bridgetmccarty.com/
               Instagram: http://instagram.com/bridgetmccartyart
               Facebook: https://www.facebook.com/bridgetmccartyart

Mickey-Candy-Apple-WIP1-(W)
I used scrap clay for the filler since the candy apple will be coated with "chocolate"

Mickey-Candy-Apple-WIP3-(W)

Mickey-Candy-Apple1-(W)

Mickey-Candy-Apple2-(W)

I hope you enjoyed the Disney food because I had a lot of fun making them. :)